
I prefer to work outside of IDEs for much of my programming, and so I dislike being forced to install Android Studio in order to work on an Android project. Lately this has been especially acute because I’m using gio and writing my Android apps in Go! Android Studio isn’t tailored for that.
This is just a quick post documenting the steps that I performed to install the basic toolchain on Pop!_OS 19.10. I expect these steps to work if you’re on any recent Ubuntu-derived system.
First, we need a place to keep our Android SDK.
export ANDROID_HOME="$HOME/SDKs/Android"

mkdir -p "$ANDROID_HOME/cmdline-tools"
You can put this anywhere, I’ll use the variable name from here on so that the rest of the commands should work regardless of where you place it.
Now we need to install java so that the Android tools can actually execute. I did this with:
sudo apt install openjdk-14-jdk-headless
Now we need to grab the Android command line tools. Go here to download them, but make sure that you don’t accidentally download Android Studio instead!
For me, that created a file called commandlinetools-linux-6200805_latest.zip. Now we need to extract it and put the contents in the correct location.
unzip ~/Downloads/commandlinetools-linux-*.zip

mv -v tools "$ANDROID_HOME/cmdline-tools/"
Note that we put the tools folder inside of cmdline-tools. If you fail to do this, sdkmanager will be broken and give you cryptic errors whenever you invoke it. I only figured this out thanks to this stackoverflow user.
Now that we have those tools installed, we need to add their location to our $PATH so that our shell can find them:
export PATH="$PATH:$ANDROID_HOME/cmdline-tools/tools/bin:$ANDROID_HOME/platform-tools:$ANDROID_HOME/emulator"
No, that’s not a typo. They do dump a bunch of executables (including adb) straight into the platform-tools folder later… Sigh. They also put the emulator executable straight into emulator (there’s another copy of emulator in tools, but it’s broken by default). For shame Android, for shame.
Now you should be able to check whether things are working so far by invoking sdkmanager:
sdkmanager
If all is well, it will display a progress bar and eventually spit out a list of installable Android components.
For my needs, I’m targeting Android 9 devices, which run API version 28. I installed the following things from sdkmanager in order to get started (YMMV):
sdkmanager 'system-images;android-31;default;x86_64' \

'ndk-bundle' 'platforms;android-31' 'build-tools;31.0.0' \

'emulator' 'platform-tools'
At this point, you should persist the changes to $PATH and $ANDROID_HOME. You should add these to your shell’s rcfile or startup script. For bash you should add something like this to your ~/.bashrc:
export ANDROID_HOME="$HOME/SDKs/Android"

export PATH="$PATH:$ANDROID_HOME/cmdline-tools/tools/bin:$ANDROID_HOME/platform-tools:$ANDROID_HOME/emulator"
For other shells, do the equivalent.
This was enough for me to get up and running on an example Gio app! You can try that yourself if you install go 1.17+ and git:
git clone https://git.sr.ht/~eliasnaur/gio

cd gio/example/gophers

go run gioui.org/cmd/gogio -target android .
This should create a file called gophers.apk in your current working directory. To test it, you’ll either need to configure the Android emulator or you’ll need to have an Android device (in developer mode) on hand. I’ll walk you through the emulator route.
First, we need to actually create an Android virtual machine (essentially). These are called “AVD”s (Android Virtual Devices) and are managed with avdmanager:
avdmanager create avd --name testdevice -k 'system-images;android-31;default;x86_64'
Note that this system image must be a version that you installed earlier with sdkmanager. I said “no” about a custom hardware profile.
Now we start our emulator:
emulator @testdevice
To allow Gio to work, we need to ensure that the emulator has a sufficiently good Graphics API available. Once you open the emulator, click the three dots in the bottom of the sidebar to open the settings.
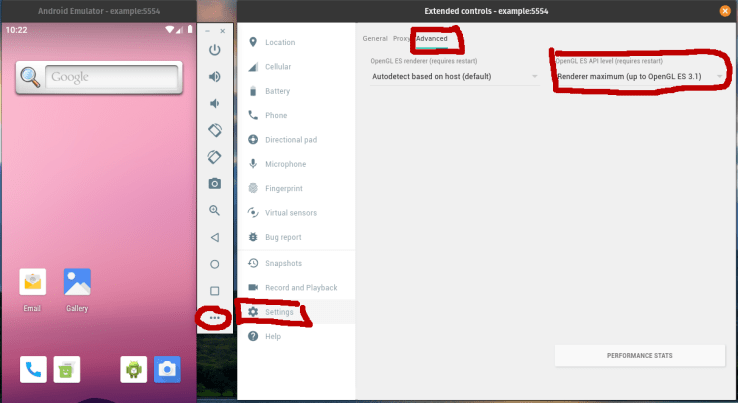
You’ll need to click the “Settings” tab in the left bar, then the “Advanced” tab in the sub-menu that it displays. Play with the available graphics settings until you can get a configuration that supports OpenGL ES 3 or higher.
Now we can run our Gio application! In a new terminal, go back to your gophers.apk file from above and run this:
adb install ./gophers.apk
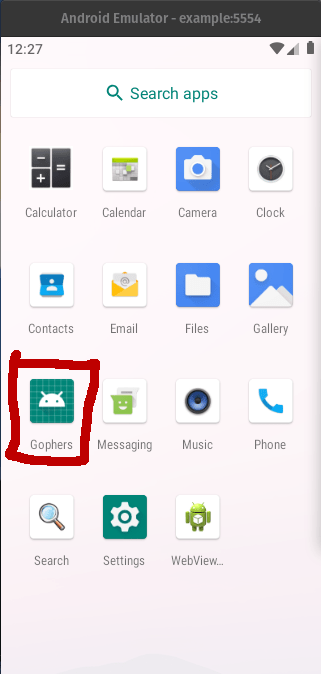
ADB should find the running emulator and install the APK just fine. You’ll need to swipe up from the bottom of the emulator to get the application listing, but you should see a new app called “gophers” available. Launch it and enjoy!

If you get a warning that adb is not found, your changes to $PATH did not persist properly. Check your shell configuration and make sure that the folders in $ANDROID_HOME actually show up when you run echo $PATH.
Edit: 2022-04-25 Updated Android SDK and Go versions for compatibility with modern Gio.
Photo by Demi Kwant on Unsplash
